So, I finally finished the installation of my spoiler this weekend. I was hoping I would have some secret sauce for future buyers to give you more confidence in doing this with exact tools and methods to easily install this. Unfortunately, that isn't exactly the case.
I will alleviate some concerns. Marking and drilling the outer holes isn’t as big of a deal as it seems. Most of the process is not overly difficult…until it is. I won’t lie. The outer bolts are a huge pain in the butt, and I really found no tool I had or that I bought to be adequate for the job. Every time I thought a tool or method would work there was another wrench (no pun intended) thrown in my way.
To be clear I am happy with how everything turned out still. The spoiler fits well even though I couldn't find a definitive solution to torqueing down the outside nuts
So, this post will be mainly going over some of the steps of getting this spoiler on with some images. Below I linked any tools or products I used that worked for me.
Some of the tools/products I used:
Removal of the Trunk Liner
I would suggest removing the trunk liner before removing the factory spoiler. It allows you to see what you are dealing with and begin to strategize the rest of your adventure installing the new spoiler.
- Remove the plastic over the latch.
Use a plastic trim removal tool to pry it off. It comes off easily.
View attachment 19521
- Remove the inner grab handle area.
Use a small plastic time tool to pop off the inner cover and then use a socket wrench with an 3”+ extender to remove the black bolt under that cover. Then grab the handle and pull it out.
View attachment 19522
- Removing the liner.
I won’t lie this process can be a bit annoying. There and 9 clips holding the liner on. Its easiest to start with are the two at the front and then work your way back. The clips seem to require pressing the metal pieces from both sides to best unclip them from the trunk, however this isn’t always possible or easily done. Sometimes the clips will unclip while just pulling on the liner a bit, some seem to come off a bit easier if you can at least press one side of the metal piece while pulling. This is one of those things that’s hard to explain, but once you start messing with it you will understand. You will need to pull or pry back liner to get access to the clips. WARNING: These clips are just melted on to the liner and it’s possible for them to break off. I accidentally broke one of mine. However, I used Loctite General Epoxy to re-attach the one clip I broke off and it seemed to work just fine.
View attachment 19523
Removal of Factory Spoiler
The factory spoiler is pretty easy to remove with some fishing line, hair dryer and trim tools.
- I completely masked off around the spoiler using 3M auto masking tape (but any painters tape should work as well).
- Just start at one end of the spoiler heating it up with a hair dryer (do not use a heat gun as it may damage things with too much heat).
- Then use some of the fishing line to kind of saw away at the trim tape hold the spoiler on. I did stop every few inches and heat up more of the spoiler around the edges.
- Eventually you will hit one of the 3 alignment posts. You can see them if you look at the spoiler area underneath without the liner.
- I heated up this area well and used different time tools to pry the spoiler up so I could then feed the fishing line under the spoiler to continue you on using the fishing line to cut away at the spoiler trim tape.
- Do the same thing when you hit the middle post.
- When you get to the 3rd post on the other end of the spoiler just take the fishing line out and start with it again at that end moving toward that post. Once you get there you should be able to pry off the spoiler.
View attachment 19524
Spoiler Removal Aftermath Clean-up
After the spoiler is removed you will be left with a bunch of trim tape stuck to your trunk lid.
- Open trunk and tape every hole in the trunk lid. This will prevent the Goo Gone from dripping into the trunk.
- Begin to liberally apply Goo Gone to trim tape. Make sure no Goo Gone is dripping down the car especially on to any badging because it will slowly eat away at any adhesive holding those pieces on as well.
- Let it sit for 30 – 60 minutes.
- I used the yellow plastic scraper from the trim tool kit I had and applied a light amount of force and scraped up as much of the tape that would come off. Most likely it won’t all come off the first time.
- Repeat steps 2 – 4 until almost all the tape is removed.
- Use a paper towel with Goo Gone to remove any remaining residue and small amounts of tape.
- Remove masking tape and make sure all residue is off.
- Clean the Goo Gone off the trunk with soap and water. It’s important all Goo Gone is removed.
- Remove tape blocking holes under trunk lid.
View attachment 19526
Drilling Holes
You will need to drill 2 new holes and open 2 existing holes up more. For this you will need a decent electric drill, a center punch, and a metric step bit (imperial may be fine as well).
Sorry I did not take any photos of what I did to get the drill locations. I was concentrating on making sure everything was correct and forgot to take pictures.
- First before we do any drilling, we will want to mask around every existing hole. Also, mask off a large area where the outer bolts will be touching the car as well. We do this so the bolts don’t scratch the existing paint.
- The second important thing to do is wad some paper towel and stuff it under where you will be drilling. This is done to hopefully catch most of the metal bits. It probably won’t catch them all, but I will address getting the remaining bits out in the Tips & Tricks section.
- Before drilling the outer holes, I opened the two oblong holes to 10mm using the step bit. It will be hard to keep the bit centered in these holes unfortunately so the holes will most likely not look pretty, but once the new spoiler is one no one will be seeing them.
- Now using the 4 existing holes set the spoiler on the trunk the spoiler will pretty much sit exactly where it needs to be, and the outer 2 bolts will be sitting on the masking tape showing you exactly where they need to go.
- You could mark this area with a pencil if you want, but what I did was rough mark them, and then put 3 more small squares of masking tape in that area. Then I put the spoiler back on and pressed down on the outside area.
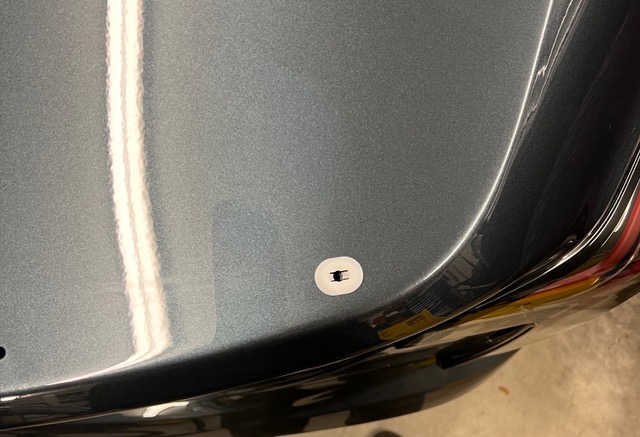
- When the spoiler was removed, I had 2 perfect little circles indented into the tape. I used these as my guides for the center punch.
- I put the center punch in the exact middle of the circle in the masking take and gave them a whack (not too hard) with the hammer. I peeled up the masking tape to make sure a proper punch was made.
- I removed the masking tape around both areas I will be drilling and re-taped around that area just for some extra protection in case the drill slipped or something. This left about a 12mm square opening in the tape around the indent from the center punch.
- Time to drill! Using a step bit, I drilled a 10mm hole in both sides of the trunk. Do not drill fast, take your time and go down one step at a time on the bit.
- Once done drill I used a deburring tool to smooth out both the new outer holes and the oblong holes I drilled out.
- Finally, I put on 2 coats of Rust Bullet (waiting 4 hours between coats).
- 4 hours after the 2nd coat I put 2 coats of matching touch up paint. This is obviously completely optional since the holes will be covered anyways. If you don’t add any paint I might suggest doing 3 coats of Rust Bullet.
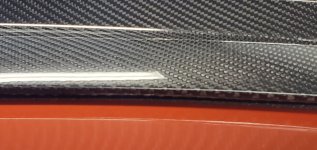
- Once everything is complete, seat the spoiler into the 6 holes and make sure everything seems good (do NOT remove the film from the 3M trim tape on the spoiler yet). Please note, the spoiler may not lay perfectly flat around the top bends of the trunk, but you should see it be flush everywhere else.
- Remove any remaining masking tape.
View attachment 19527
Attaching Spoiler
I suggest having a 2nd person help with this. Preferably a petite woman or man with skinny forearms. I am not a huge guy and I could not get my arms far enough in to get to the outer bolts. You may want to do some dry runs with this person to make sure they can reach that area. Also, I suggest wearing something light fitting on your/their arms and some rubber gloves to help protect against the sheet metal scratching you. Another suggestion is to use an endoscope camera when you get to the outer bolts so you and this person can see what the hell is even going on. I bought a cheap $27 one that worked with Android/iPhone off Amazon.
Unfortunately, these instructions do NOT offer a definitive solution in-regards to attaching and tightening outer bolts. I will let you know my experience.
- Remove the threaded bolts from the spoiler and apply Loctite (would suggest glue stick style as it will come in handy later) to the short end and then screw them back into the spoiler.
- Stuff paper towel in all the areas nuts could drop into the trunk.
- Clean off the area where the spoiler will be using a cloth that will not leave any lint and some. Make sure all residue is 100% gone and use isopropyl alcohol to clean the area.
- Remove the backing of trim tape on the spoiler.
- You and the other person lower the spoiler down making sure all 6 bolts go into the holes without scratching the paint.
- Now slowly lower the spoiler down and attach it to the trunk with pressure. Go around the spoiler and press down making sure it is nicely stuck to the trunk.
- Apply Loctite to one of the oblong hole bolt threads and then using a socket wrench and about a 3” extension and a deep 10mm hex socket screw down one the included nuts. Make sure it’s tight, but do not over tighten. Then do the same thing with the other oblong hole thread.
- Now apply Loctite to one of the inner bolt threads and using a 1” extender and a deep 10mm hex socket bit screw down the tighten that bolt and then the other inner bolt.
- And now we are here...the absolute worst part of this installation. How the hell are you going to get those nuts on those outer bolts? I will just tell you what I did. My wife was able to fit her hand into that area and watching on the endoscope she first put some Loctite on the thread and then reached back in and was able to thread the nut on to the bolt. She threaded it all the way down as tight as she could.
- Now is the time you expect me to tell you how to torque these nuts down. The short answer is, I didn’t, not really. I would have preferred to, but no method or tool we tried worked to allow us torque these screws down with any significance. After trying many things, we gave up. Basically, what we did was I squeezed the spoiler down to the trunk as much as I could as she manually tightened it down a little but more and then she slathered it with some Loctite and called it a day. I will talk about some of the reasons this is such a pain in another section.
View attachment 19528
Finalizing
- Make sure all masking tape and paper towel is removed.
- If you have any metal shavings stuck in the trunk lid, go to the Tips & Tricks section to see the best way to remove those.
- Re-attach the trunk liner. It’s straight forward, just make sure you tuck under the hinge plastic covering first.
- Re-attach plastic piece around latch and the hand grip (make sure you put screw back in).
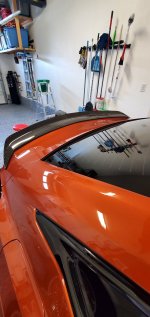
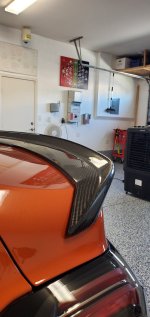
- And you are done! Site back and admire your new spoiler.
View attachment 19529
View attachment 19530
View attachment 19531
Issues with Outside Bolts
So before giving up trying to torque down the outside bolts I tried a few different things.
First I tried using
THIS 8 inch extender. It could reach the bolt just fine, but the problem is because the bolt threads are so long I had to use a pretty deep socket to even consider torquing the nut down. There was just not enough room to get the longer socket over the bolt.
So, I realized I was going to need a pass-through extender. The only ones I could find are
THESE, but they aren’t a pass-through extender that could accept a pass-through socket. They are a set of extenders that work on different sized hex nuts. The problem with these is they were about 2 inches too short to reach and they fell off too easily when I attempted to combine these with the other 8-inch extender. Stupid me was just testing it out to see if it would work before I packed any paper towel into the trunk and the extender will into the top of the trunk. It took a lot of backing the car up and slamming on brakes, along with shaking trunk, using endoscope camera and a wire cloths hanger made into a hook to get it out. It was a nightmare.
So, my final thought was buying
THIS set of pass-through sockets from Home Depot. Honestly, I thought for sure this would be the solution. It was not. There was just not enough room to really get it to ratchet much at all. We were semi-successful on the first attempt, but honestly it wasn’t long enough to get any significant torque on it at all.
My guess is if I kept working at it I would have eventually found something that would work and maybe others on here have and they can share their solutions, but at this point I was happy with how the spoiler was sitting and was kind of exhausted so I called it good.
In my opinion the retainer clips they use for OEM would be the way to go assuming they work on the bolts provided with the spoiler. I would highly suggest
@Terrance Sig investigate a solution like this and at least include it as an option.
If someone has a definitive solution, I hope they post it for future buyers.
Some Tips & Tricks
- Metal Shavings Stuck in truck lid
Before putting your truck liner back on you will want to make sure you get out any metal shavings that fell into the truck lid during drill. Hopefully the paper towel caught most of them, but a few may have fallen in. Getting them out is simple, just takes a few minutes. Just shake the trunk up and down, raise it all the way up, shake it up and down some more, raise it all the way up. As you do this you will notice little pieces falling out of the holes. It took me about 5 minutes to get them all out.
- Broke off trunk liner clip(s)
While you really want to avoid breaking any of the clips off, its going to happen to some people. Just use some general epoxy (I used Loctite General Epoxy [https://www.amazon.com/dp/B0044F9KFI]) to reattach the clip.
- Prevent Goo Gone from getting in the trunk
Open the trunk and put tape over all the open holes while you are getting the old spoiler’s trim tape off. This will prevent Goo Gone from dripping into the trunk.
- Use glue stick style Loctite
Using the glue stick style will allow you to easily apply Loctite with one hand in cramped areas of the trunk.
- Patience
Do not rush anything. Make sure you do things right and take any preventative measures to ensure you don’t drop anything into the trunk or scratch your car.