Welcome to the Cadillac V-Series Forums!

Ct4V BW Outside Bumper Edges

bigE1844

Member
Joined
Jul 17, 2023
Messages
6
Location
Charleston, WV
V-Series Cadillac(s)?
2023 CT4-V Blackwing
I have a non CF Blackwing and recently came across a steeper expected road curb / sidewalk and scratched up the gloss black piece on the passenger side edge of the front bumper. I have searched online for a new part but I am unable to locate it exactly. Does anyone either know the technical name for that or have a part number to properly search? With this being the first part to with clearance issues for park curbs as well I assume it will be a common replacement.
 
Go to any of the online parts sites. Put in your year and body style. Then select Body, then
Bumper and Components - Front. It's number 13. Or you can just type in these part numbers:

1692845307329.png


There is a $75 core charge, and they probably will be primer surfaced and need painting. The plastic rocker molding did. If it's just scratched/scuffed you'd be better off having a body shop fix it and paint it.
 
Last edited:
Go to any of the online parts sites. Put in your year and body style. Then select Body, then
Bumper and Components - Front. It's number 13. Or you can just type in these part numbers:

View attachment 21261

There is a $75 core charge, and they probably will be primer surfaced and need painting. The plastic rocker molding did. If it's just scratched/scuffed you'd be better off having a body shop fix it and paint it.
Thanks for the look up, I saw that exploded view on one site but that part number they had listed was for something on the rear. I agree though I would probably be better off having someone repair it for that cost of new. I believe it is just 2 bolts in the bottom and it comes right off.
 
No, you have 4 T5 screws and 3 clips. The clips will be white unlike the one I'm showing here in black, but physically the same. They push in front up top inside the bumper cover. There are openings underneath where you can see the bottom of the clips. The three tabs of the splitter slip through three slits in the bumper cover, and the clips hold it in place. I had my whole bumper cover off (shown below) so you can see what is going on. To disengage them, press on the tongue and push it up. I tested getting the clips back on, and it looks like you can do it if they are in position and you can get a small screwdriver into the slot of the clip between the tongue and the side, then push it in pulling the clip into position. You can see my splitter is also scraped. I've since had the driveway to street slope fixed and the carbon is still intact :cool:

1692850664040.png


1692850853953.png

1692851047390.png

1692851184670.png

1692851356153.png

1692851403309.png


I can't verify the screwdriver will pull in the clip in the car, but it worked in my lap. 🤭
 
No, you have 4 T5 screws and 3 clips. The clips will be white unlike the one I'm showing here in black, but physically the same. They push in front up top inside the bumper cover. There are openings underneath where you can see the bottom of the clips. The three tabs of the splitter slip through three slits in the bumper cover, and the clips hold it in place. I had my whole bumper cover off (shown below) so you can see what is going on. To disengage them, press on the tongue and push it up. I tested getting the clips back on, and it looks like you can do it if they are in position and you can get a small screwdriver into the slot of the clip between the tongue and the side, then push it in pulling the clip into position. You can see my splitter is also scraped. I've since had the driveway to street slope fixed and the carbon is still intact :cool:
Awesome and informative post, thank you.

OP, I scuffed up mine as well and agonized over it. I decided to just leave them alone because I figured it would inevitably happen again, and lo and behold it has, several times.

If I were to do something about it, I would probably take them off, sand down the scuffage, and spritz them with some gloss black, rather than shelling out to replace them. I doubt it would be noticeable based on where they are.
 
My other side was scuffed worse than the one shown. But you couldn't see either one unless you put your head to the ground to look up at it. Eventually there will be other underside plastics that will get scuffed too.
 
@sethsquire (and @bigE1844) I scuffed mine like three weeks after getting the car and got a recommendation to just put matching black tape on both sides rather than replacing. You can barely tell the tape is there, and it’s easy to switch out if a new scuff occurs. I don’t even think about it anymore. It’s on the leading edge of the splitter here;

52D3521C-EE76-4AE1-BC10-4A67137B74D1.jpeg
 
@sethsquire (and @bigE1844) I scuffed mine like three weeks after getting the car and got a recommendation to just put matching black tape on both sides rather than replacing. You can barely tell the tape is there, and it’s easy to switch out if a new scuff occurs. I don’t even think about it anymore. It’s on the leading edge of the splitter here;

View attachment 21279
This is a fantastic idea!

Edit: Which tape did you use? Just black electrical tape?
 
If you want to get fancy, you might try this stuff. Saw an example at the local detailer and it is almost a perfect match. It doesn't look like you can buy it yourself, but if your detailer has it they might be able to sell you a piece or install it for you. I think it installs similar to ppf. DYNOcarbon-gloss Carbon Fiber Pattern PPF | STEK USA
 
This is a fantastic idea!

Edit: Which tape did you use? Just black electrical tape?

It was actually done by a body shop that repaired a paint scratch for me. I asked them for advice on the CF scuff, and they did the taping while it was there as a courtesy. So I’m not 100% sure. But I think electrical tape would do the trick!
 
@sethsquire (and @bigE1844) I scuffed mine like three weeks after getting the car and got a recommendation to just put matching black tape on both sides rather than replacing. You can barely tell the tape is there, and it’s easy to switch out if a new scuff occurs. I don’t even think about it anymore. It’s on the leading edge of the splitter here;

View attachment 21279
What are we looking at?
 
Awesome and informative post, thank you.

OP, I scuffed up mine as well and agonized over it. I decided to just leave them alone because I figured it would inevitably happen again, and lo and behold it has, several times.

If I were to do something about it, I would probably take them off, sand down the scuffage, and spritz them with some gloss black, rather than shelling out to replace them. I doubt it would be noticeable based on where they are.
Not a bad idea, I initially thought mine was worse that it is because what I was seeing was the PPF that had peeled up because of it. That definitely helped lessen the hit but I agree, it will happen again especially out in the WV roads.
 
Not a bad idea, I initially thought mine was worse that it is because what I was seeing was the PPF that had peeled up because of it. That definitely helped lessen the hit but I agree, it will happen again especially out in the WV roads.
I actually had the exact same experience. I though they were absolutely wrecked but what I'm actually looking at is the wrecked ppf. I think it would look a lot better if I pulled it off, but I'm going to try and maybe cut it back a bit and try Seth's tape fix
 
I actually had the exact same experience. I though they were absolutely wrecked but what I'm actually looking at is the wrecked ppf. I think it would look a lot better if I pulled it off, but I'm going to try and maybe cut it back a bit and try Seth's tape fix
That tape is a solid idea but might look off sense mine is not CF, just the glass black. I may pull my PPF off too. The guy that installed it may put another piece back on for free/cheap and that would probably disguise most of whatever damage is there, if possible that is.
 
That tape is a solid idea but might look off sense mine is not CF, just the glass black. I may pull my PPF off too. The guy that installed it may put another piece back on for free/cheap and that would probably disguise most of whatever damage is there, if possible that is.
That's interesting. I would think the black tape would work better on the gloss black than the carbon fiber, since it would match better. I'll put my theory to the test at some point in the next few days.
 
Apologies for reviving an old thread, but it seemed more appropriate than creating a new one for what I wanted to share.

Already a lot of good info shared here, but I'm going to consolidate and add my two cents.
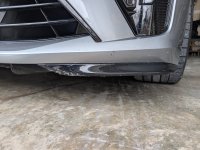
These pieces are definitely a wear item unfortunately. When I bought my preowned 4 BW, the two pieces were scuffed up pretty badly - one of them was missing a chunk. This is why I didn't really care for the exterior CF trim as much as I love CF.

Taking it off is a little tricky. As already mentioned, there are 4 T5 screws - easy. Then there are these 3 white clips that need to be pressed in (small flat head will do) and pushed upwards. Taking off the bumper would obviously make this easy, but you definitely do not need to do that. I didn't and just used a ramp to get some space while laying underneath. Apparently these white clips are prone to breaking, but I didn't have any break on me. Now, I will say they are close to impossible to get them back in. I assume they are easy to pop back in if the bumper is removed. That being said, I didn't even bother popping them back in and just secured them with the 4 T5 screws - seems to do the job just fine.

If you want to replace them, the part numbers are 84590904 (passenger), 84590905 (driver). They come painted so all you have to do is install them. This is the most expensive option and I believe there is a core charge involved.
Next option is Tapout Tuning's CF option. This is a way better deal and you get two CF pattern options. That said, if you don't have any other CF on your car, it may look off, but that's subjective.
Last option is to FIX IT YOURSELF (I suppose you could pay one of those mobile car paint guys to do it as well, but that would be more $). Guys, it's easy and cheap. It will take a day or two, but that's mostly due to sanding and paint curing time. It can be fun depending on what you're into.
  • Depending on how bad the rash is, use an appropriate grit sandpaper to level as best you can.
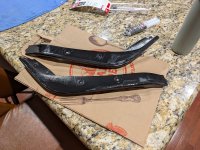
  • There are different variants, but use this plastic body filler to fill in any gaps or voids. Use a glove and just smooth it over as you taper off the edges. Doesn't have to be perfect because you're going to sand again. Once dried, use an appropriate grit sandpaper (probably higher than originally used) to blend the filler into the rest of the piece. Lastly, use a high grit sandpaper to get as smooth of a surface as you can. Rinse clean and completely dry.
  • Now you have two options: use gloss black wrap (this is the correct amount of what you'd need) or spray paint with this and this.
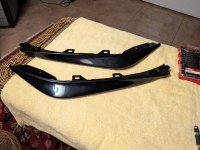
    • I started with the wrap. It was pretty hard, but I finally got it about 90%. This definitely looked the best, but I couldn't get the edges to lay down properly.
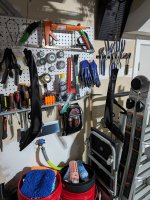
    • I took off the wrap and went the spray paint route. I'm not sure which was harder. I messed up 3 times before getting it right. It's definitely an art to get the spray paint smooth. If you mess up, you basically have to sand it back down with high grit and start again. Thankfully it blends well and obviously the coverage was way better than the wrap so I didn't need to worry about the edges. In my opinion, this is the way to go and is the same cost as the wrap.
  • This will 100% fix the issue, but even if it's not perfect, you or anyone else will not be able to tell because you'd really have to get down and look at it closely.
  • I'll post some pictures below. You can see different parts of the steps; the picture with the yellow towel is when the pieces were wrapped and the last picture is of them painted. Lastly, I am getting these pieces PPFd, but that's not shown.
 

Attachments

  • PXL_20260225_155358330.jpg
    PXL_20260225_155358330.jpg
    1.8 MB · Views: 25
  • PXL_20260306_031547325.jpg
    PXL_20260306_031547325.jpg
    2.4 MB · Views: 24
  • PXL_20260308_003508175.jpg
    PXL_20260308_003508175.jpg
    1.6 MB · Views: 21
  • PXL_20260308_041353775.jpg
    PXL_20260308_041353775.jpg
    706.9 KB · Views: 18
  • PXL_20260331_103019300.jpg
    PXL_20260331_103019300.jpg
    1.6 MB · Views: 26

Double Your Chances!

Supporting Vendors

Apex Wheels

Exhibitions of Speed

Signature Wheels

V-Series Marketplace

Advertise with the Cadillac V-Net!

Torque Shop

Our Partners

Back
Top Bottom