Welcome to the Cadillac V-Series Forums!

Carbon fiber PN database.

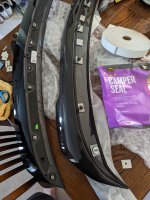
I thought I'd pass on some lessons I learned installing the carbon rear spoiler. In this case, it was the Tapout repro version, but that's just incidental to the story.

Removing the OEM spoiler was a pain. I thought the fishing line would work well, but once you get to the first stud things get interesting. The Tech Manual instructions say to just move around the stud, but no way you can string it through to the inside. I tried squeezing the plastic outer clip while pushing up and eventually got the line through. But the adhesive tape on the left side was super aggressive, and I had to use a dull flat metal blade (actually a stainles steel offset spatula) to work through it. Used tape to protect the paint, and it finally worked.

Before I installed the carbon spoiler, I added some adhesive weather stripping around the stud holes to replicate the OEM. I think it should help seal any water getting past the outer weather stripping. This stuff was about $10 for 30 feet, and it's about the same thickness at the outer but softer so it should mold into the hole. I re-used the four OEM nuts because they also had nylon locks.

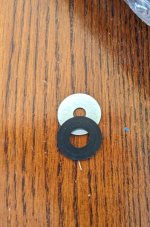
I bought a neoprene and metal washer for the outer stud, and a stainless steel nylon locknut.

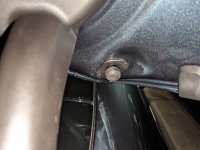
It went OK until the washer and nut dropped down inside the trunk lid. Several hours trying to fish them out with a wire with a hook on the end didn't work, and the trunk lid sounded like a piggy bank with two coins clinking around in it. I bought a flexible magnet pick up from Harbor Freight and slipped it in, then it promptly wedged into the gap between the outer and inner trunk metal. A couple more hours trying to get the magnet unwedged finally worked, but now I have dimples in the outer trunk skin where it wedged.

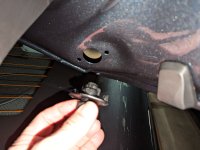
Now the important part. After I got the magnet out, I noticed the two rubber bumpers in the lower corners (when raised) and saw one of the little pins was slightly out. I saw them before, but thought they were fixed in and couldn't be removed. Well, just for kicks I got my fingernail under one of the pin heads and it pulled right out. Did the same for the other pin. Then the whole bumper just popped out leaving a nice big opening where the washer and nut were just sitting, ready for me to slip my finger in and get them out. I imaging most of you knew this already, but for anyone that doesn't, it literally takes no tools and about 20 seconds of time to open an access to anything that drops when you are trying to work on the outside spoiler stud. Now I get to take a trip to a dent repair place to see if they can flatten my deck lid.

Oh, by the way, a couple more things. The washer always falls, so I got a small piece of masking tape and stuck to one side overhanging the edge of the washer. Then when I got it on the stud, I pushed it up and pressed the tape against the trunk lid so it held until I could get the nut started. Then I pulled it off before tightening the nut. Also, I folded a blanket and laid across the entire back window when the trunk was open and I was tightening or loosening fasteners. If you drop a wrench, it will drop onto the rear window and probably break it. That's at least one thing that survived this event.
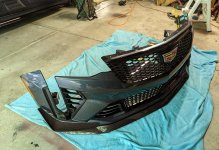
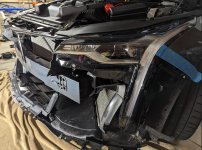
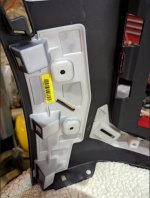
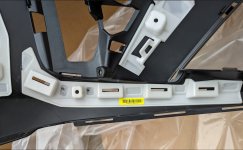
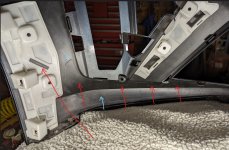
Here's a few pics:
 

Attachments

  • PXL_20230411_173840470.jpg
    PXL_20230411_173840470.jpg
    3 MB · Views: 169
  • PXL_20230411_173851149.jpg
    PXL_20230411_173851149.jpg
    603.3 KB · Views: 170
  • PXL_20230412_010002318.jpg
    PXL_20230412_010002318.jpg
    2.5 MB · Views: 154
  • PXL_20230412_010046427.jpg
    PXL_20230412_010046427.jpg
    2.5 MB · Views: 172
Last edited:
Well hello beautiful. Some notes, this splitter is hella light. Like less than a pound. Truly was done as a race car part where weight and structure was key. It's only a few layers thick of carbon and super flimsy. The vacuum bag is also hilariously still stuck inside the cavity. Mounting was pretty straightforward with a decent amount of bolts and 3 annoying white clips on each end (factory mounted to the black corner pieces). 95% of removal and installation time pertained to getting the clips out and back in. I didn't bother lifting the car up so I also quickly admitted defeat and didn't install the center 2 clips as I couldn't easily reach them.

Got this from gmpartswarehouse. Total came out to $742 including $12 to ship in case anyone was curious. Took about 2.5 weeks from when I ordered it.View attachment 17045View attachment 17046View attachment 17047
Can you go over the removal of the two stock black splitter lips?

I don't want the carbon fiber splitter, I'll destroy it. I know it. I want the 2pc standard stuff in carbon. If I can't get someone to make me a set, I'll wrap them myself in the mean time.
 
There are 4 screws and 3 clips per side. The clips are NOT easy to get to and remove. Certainly not easy to re-install either. You can wrap it while on the car, and that is what I would advise.
Here are some pics of the pieces off the car, including a few of the clips... They slot in from the top and have to be pushed in and up to remove.
20230413_193957.jpg
20230413_193933.jpg
20230413_193921.jpg
 
Lower no, further out yes. And don’t forget to order the aero pieces for underneath. For the lip you have to take off the 3 plastic covers under the car. It’s a torque bit, but I believe it was a t15. And remove the 5 10mm bolts for all 3 pieces to come out. And there is about 20 or so torque screws to remove underneath. And the top part of the splitter is plastic clips. There’s going to be 4 clips that you’re not gonna be able to put back in, but you could put them in upside down instead of the way that you took them out. no way to put them back in without totally disassembling the underneath. there clip in so don’t worry they won’t fall out. Total time of installation 1.5 hours. Just need a lift, makes it so much easier!
Do you happen to know the PN for the 4 clips?
 
Do you happen to know the PN for the 4 clips?

If you search Amazon you can get them a lot cheaper https://www.amazon.com/dp/B09PRDWDWG?psc=1&ref=ppx_yo2ov_dt_b_product_details
 
FYI
My parts dealer notified me that PN: 84981408 has been replaced by PN: 87825668
CT5-V BW Rear Valanace / Diffuser CF
Its also like $1000 more now.
 
FYI
My parts dealer notified me that PN: 84981408 has been replaced by PN: 87825668
CT5-V BW Rear Valanace / Diffuser CF
Its also like $1000 more now.
that's why you should order the replica from here Blackwing. its what i did
 
That part number I referenced is the large panel under the rear of the car by the exhaust.

I am going with Terrance for the Front Splitter and Rear Wing!
 
Finally got the bumper with the CF1 bits installed. It took a few hours, but it wasn't too bad except for the clips under the headlights. Those were a little tricky but I got it worked out. Before and after below.
 

Attachments

  • Cadillac CT4-V BW.jpg
    Cadillac CT4-V BW.jpg
    621.1 KB · Views: 196
  • Screenshot 2023-05-27 172911.jpg
    Screenshot 2023-05-27 172911.jpg
    413.1 KB · Views: 177
  • Screenshot 2023-05-27 173055.jpg
    Screenshot 2023-05-27 173055.jpg
    447.1 KB · Views: 183
  • Screenshot 2023-05-27 173151.jpg
    Screenshot 2023-05-27 173151.jpg
    666.9 KB · Views: 188
Congratulations, it looks great! For the heck of it I have a nationwide search on Autotrader for the 23 CT4-V BW and look at each one that comes up to see if any have the CF trim. I have seen none that did in 23 except the +$20k special edition models. They all seem to include CF bits. Mine was a Mar 22 build date and luckily it have both CF1 and CF2 installed as delivered.
 
Finally got the bumper with the CF1 bits installed. It took a few hours, but it wasn't too bad except for the clips under the headlights. Those were a little tricky but I got it worked out. Before and after below.
Wow, love the dive planes, like on the Camaro ZL1 1LE I used to have. Wish they would’ve done that to the CT5-V
 
Some information for anyone else considering a CT4 BW Dive plane/splitter upgrade. I wish I knew this before I did mine, but now I know I can pass it on to others and save you the effort and money. I at one point considered detaching the backing support from the OEM CF bumper and cutting the slots in my original non-CF bumper. But I didn't want to risk making a template and getting positioning of the support bracket wrong. So I spent the money to have the replacement CF bumper painted, and had the PPF and ceramic redone. But, here is what I found that makes me wish I had used the original bumper and slotted it. It turns out the non-CF bumper has an outline of the support bracket AND the four slots it uses. The fifth (outer) slot is already in the outside support bracket - it's identical to the CF bumper. And so the slot is already positioned. So if you had a bracket, you could cut the slots, attach it, and you would have the CF bumper using your original bumper. Even if you have to buy the whole bumper, it was only $400 MSRP from the local dealer. It's much less from the online dealers, but the shipping is more than the part. It's a very large box. I have pics of it further up the message thread. Here are photos of the CF bumper, and the original non-CF bumper I replaced on my car.
 

Attachments

  • left outer CF.jpg
    left outer CF.jpg
    159.6 KB · Views: 118
  • Left Inner CF.jpg
    Left Inner CF.jpg
    230.5 KB · Views: 115
  • Left Standard.jpg
    Left Standard.jpg
    379.3 KB · Views: 122
Some information for anyone else considering a CT4 BW Dive plane/splitter upgrade. I wish I knew this before I did mine, but now I know I can pass it on to others and save you the effort and money. I at one point considered detaching the backing support from the OEM CF bumper and cutting the slots in my original non-CF bumper. But I didn't want to risk making a template and getting positioning of the support bracket wrong. So I spent the money to have the replacement CF bumper painted, and had the PPF and ceramic redone. But, here is what I found that makes me wish I had used the original bumper and slotted it. It turns out the non-CF bumper has an outline of the support bracket AND the four slots it uses. The fifth (outer) slot is already in the outside support bracket - it's identical to the CF bumper. And so the slot is already positioned. So if you had a bracket, you could cut the slots, attach it, and you would have the CF bumper using your original bumper. Even if you have to buy the whole bumper, it was only $400 MSRP from the local dealer. It's much less from the online dealers, but the shipping is more than the part. It's a very large box. I have pics of it further up the message thread. Here are photos of the CF bumper, and the original non-CF bumper I replaced on my car.
What was the cost to get the new bumper painted? Any color match issues? (Probably had a better finish than GM OEM if I had to guess 😂) good writeups on the bumper swap. It seriously has be debating doing it in the future.
 
It cost $490 for paint incl. tax, $930 for new PPF and ceramic. The bumper cost $397 incl. tax, but includes a $75 core charge. You could conceivably buy the bumper, remove the supports, and return it for the core charge.

The paint match is what is bothering me. In my garage the paint looked perfect, but when I installed it and rolled it out into the sun, I see a pretty distinct mismatch with the bumper being lighter. It's odd though, because if you put your face right up to the match line of the bumper to fender, it's a solid match. The only thing I can think is that the metallic laid down differently and the sun reflects a different hue at certain angles. This is the bad angle when I first noticed it. I'm trying to ignore it, but I really can't. My wife thinks I'm nuts.
 

Attachments

  • Screenshot 2023-05-29 234901.jpg
    Screenshot 2023-05-29 234901.jpg
    763.9 KB · Views: 119
It cost $490 for paint incl. tax, $930 for new PPF and ceramic. The bumper cost $397 incl. tax, but includes a $75 core charge. You could conceivably buy the bumper, remove the supports, and return it for the core charge.

The paint match is what is bothering me. In my garage the paint looked perfect, but when I installed it and rolled it out into the sun, I see a pretty distinct mismatch with the bumper being lighter. It's odd though, because if you put your face right up to the match line of the bumper to fender, it's a solid match. The only thing I can think is that the metallic laid down differently and the sun reflects a different hue at certain angles. This is the bad angle when I first noticed it. I'm trying to ignore it, but I really can't. My wife thinks I'm nuts.
It's something that only a few would catch but I totally get it..I can tell you where every flaw is on my paint. Metallic sucks to match perfectly sometimes and that is definitely a bit off with the flake. Worst case you could probably get the slots drilled in the original bumper and swap things over if the color match isn't to your liking. I'd be curious on the mounting pieces and if I could 3d print something to emulate it without having to get the entire bumper.
 
Finally got the bumper with the CF1 bits installed. It took a few hours, but it wasn't too bad except for the clips under the headlights. Those were a little tricky but I got it worked out. Before and after below.
How is drivability with the carbon splitter vs before? Are you scraping everywhere? I love the look but concerned that I would destroy it very quickly.
 
How is drivability with the carbon splitter vs before? Are you scraping everywhere? I love the look but concerned that I would destroy it very quickly.
We famously had a customer damage their splitter pulling into their garage a day after delivery. Garage was at the end of a downslope driveway and leveled off to the garage. That plus Vette ownership experience turned me off to the splitter. Track toy, yes. Daily, no. YMMV.
 
I've only scraped my splitter once, I was 50/50 on that particular spot having that problem. It was only a long the bottom, so not visible unless you look under the car. My Z06 is definitely more challenging, though on the air dams, not the splitter.
 
How is drivability with the carbon splitter vs before? Are you scraping everywhere? I love the look but concerned that I would destroy it very quickly.
I've only had the splitter for about a week, but no problems with my driveway (after it was improved entering the roadway) even with the standard splitter. I was always careful on any of my cars going head in with parking blocks and curbs.
 
Last edited:
CT5VBW CF2 question - Does it only replace existing composite parts with CF? In other words, the car comes standard with composite rockers and rear diffuser and the upgrade just swaps those for CF?

So, from an aero perspective, only CF1 does anything, correct?
 

Win 2 Supercharged Cadillacs!

Win both supercharged Cadillac Vs!

Supporting Vendors

Delaware Cadillac

Exhibitions of Speed

Signature Wheels

Taput Tunning LLC

V-Series Marketplace

Advertise with the Cadillac V-Net!

Torque Shop

Our Partners

Back
Top Bottom