OK maybe you shouldn't be offering to connect things to your car or you need to re-read the manual a few more times. But in case you really really really want to do it: red cable goes to #7 (after you remove the red plastic cover), and black goes to #9. Connections happen at the end of lines 7 and 9, not at the numbers themselves. All the other numbers on the diagram are for other things, not for jump starting cars as explained on the page after this picture. Also this picture is in black and white, your car is probably not black and white inside.
Wife's van is broken down, I'm trying to help with a car I've had for 6 months. I've jump started cars a billion times and never worried about it. If I short out the electronics we're both boned. A guy parked next to us and we jumped it in seconds, I had to walk him through it. I realize you think I'm an idiot here, but I have no interest in finding out I am by wrecking my new car. I tried flipping through the manual and checking youtube, but was not 100%, guaranteed no doubt confident.
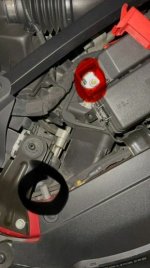
So I took a pic with the indicated spots. Am I correct in saying, under the assumption I have a working battery and my wife's van has a dead battery that the steps are.
1) Place (+) red end on dead battery (honda)
2) place (+) end on live battery (blackwing, as circled in pic in RED)
3) Place (-) end on live battery (blackwing, as circled in pic in BLACK)
4) connect (-) end on dead battery (honda)
Start blackwing and let run for a few minutes, and then start honda. All good hopefully.
Removal prodecure, Exact reverse.
1) remove (-) end off dead battery (honda)
2) Remove (-) end off live battery (blackwing, as circled in pic in BLACK)
3) remove (+) end off live battery (blackwing as circled in pic in RED)
4) remove (+) end off dead battery (honda).
For the record I'm buying a GB70 and not ever going to try this, but maybe I can feel like I at least know how in case it matters.
 on point with the jumper box. I have them in all my cars because the libertarian in me says to be ready to help yourself. Helping others without risking my car is secondary.


