Can someone describe for me how to remove this fender marker light? I removed the inner fender torx screws to gain access to the backside of the light but don't see how to remove it from the fender. Thanks.
There are tabs that need to be squeezed then pushing the lamp assembly away from the car. Below is a photo from Amazon you can see the tab on the right side.
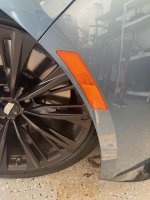
Funny I just did those today. Here are basic instructions for 5BW (or any CT5 I assume):
1. Turn wheel all the way so you can access.
2. Remove 4 screws in the front of the wheel well (requires a small torx bit, don't remember which size). You may need a shorter driver or ratchet with hex adapter for top one.
3. Pop out liner a bit. I would suggest using a plastic trim tool if possible.
4. Once you can pull liner out a bit using a flash light you can kind of see what is going on.
5. You just need to unclick the one double tab, first push down on the top bit and you will probably hear small click, then push up on bottom bit and you should hear another small click and then push it out. If this doesn't work you may need to push on both sides at the same time.
6. Push marker out so you can access connector.
7. Push a screw driver into the area with the red tab to push the red tab in then use screw driver to push up black tab that's touching the marker and pull out connector.
8. Connect connector to new marker, pull red tab out how it was.
9. Put bottom tab of marker in first then push top in until it clicks.
10. Put liner back in and screw back together.
This literally will take about 5 minutes per marker. Its pretty simple.
1. Turn wheel all the way so you can access.
2. Remove 4 screws in the front of the wheel well (requires a small torx bit, don't remember which size). You may need a shorter driver or ratchet with hex adapter for top one.
3. Pop out liner a bit. I would suggest using a plastic trim tool if possible.
4. Once you can pull liner out a bit using a flash light you can kind of see what is going on.
5. You just need to unclick the one double tab, first push down on the top bit and you will probably hear small click, then push up on bottom bit and you should hear another small click and then push it out. If this doesn't work you may need to push on both sides at the same time.
6. Push marker out so you can access connector.
7. Push a screw driver into the area with the red tab to push the red tab in then use screw driver to push up black tab that's touching the marker and pull out connector.
8. Connect connector to new marker, push red tab back.
9. Put bottom tab of marker in first then push top in until it clicks.
10. Put liner back in and screw back together.
This literally will take about 5 minutes per marker. Its pretty simple.
Oddly enough, the CT4-V BW uses a screw....just FYI for people thinking these will apply to 4's as well as 5's, it mostly does but there is a screw you need to get off and then re-apply to the new side marker.
This site uses cookies to help personalise content, tailor your experience and to keep you logged in if you register.
By continuing to use this site, you are consenting to our use of cookies.